ESP32: a complete guide to features, family, programming and uses
From the first question to the hardware design: the complete map of the ESP32, in the order you need it.
ESP32 at a glance
The ESP32 is a family of 32-bit microcontrollers from Espressif Systems that puts Wi-Fi and Bluetooth inside the chip itself, for a few dollars. Instead of wiring a microcontroller to a separate radio module, you get processor, memory, radio and peripherals in one component. That is why it became the default choice for anyone who wants to put a sensor, a relay or a screen on the network without building a complicated board.
- Maker: Espressif Systems, released in 2016 as the successor to the ESP8266.
- Radio: Wi-Fi 802.11 b/g/n at 2.4 GHz, plus Classic Bluetooth and BLE on the models that include them.
- Processor: one or two 32-bit cores, up to 240 MHz (Xtensa or RISC-V, depending on the model).
- Voltage: 3.3 V on the pins and the core. The pins do not tolerate 5 V.
- Programming: ESP-IDF, Arduino, PlatformIO, MicroPython and others, all flashing the same chip.
This guide is the complete map: what the chip has, how it works, which variants exist, how you program it, where it earns its place (including in industry) and which cautions prevent rework. Each topic has its own article on the portal, and the links are along the way. If you are in a hurry, jump straight to the contents at the top of the page.
What is the ESP32?
The ESP32 is a system-on-chip (SoC): a single integrated circuit that brings together CPU, memory, radio and peripherals. It was released in 2016 to replace the ESP8266, which only had Wi-Fi and a single core, and it brought two cores, Bluetooth, more memory and far more peripherals all at once.
Before it, putting a device on the network meant pairing a microcontroller with a radio module and writing the code that made them talk. The ESP32 reduced that to one component, and it was that simplification, more than speed, that changed the IoT market.
It helps to separate two terms that get mixed up:
- ESP32 chip: the silicon itself, which almost nobody handles directly.
- ESP32 module: the chip together with flash memory, an antenna and supporting components, on a small board already certified for radio. The ESP32-WROOM-32 and the ESP32-S3-WROOM-1 are examples.
The distinction matters because development boards and real products are built around a module, not the bare chip.
General characteristics of the family
Because "ESP32" is a family, the numbers vary from model to model. In general:
- CPU: Xtensa LX6 or LX7 (the fuller models) or RISC-V (the C and H series, and the P4).
- Frequency: from 96 MHz to 240 MHz on most models; the P4 reaches 400 MHz.
- Radio: Wi-Fi 802.11 b/g/n at 2.4 GHz (Wi-Fi 6 on the C6), Classic Bluetooth only on the original ESP32, BLE on most.
- Operating voltage: 3.3 V.
- GPIO: on the order of 20 to 40 usable pins, depending on the model and module.
- ADC: 12-bit SAR analog-to-digital converter.
- DAC: two 8-bit channels on some models (ESP32 and S2).
- USB: native USB (OTG) on the S2 and S3, and integrated USB serial on the C3, C6 and H2.
Note: always confirm the exact values in the datasheet of the module you are going to buy. Current, operating temperature, pin count and memory change from module to module, and pinning everything to a single number for the whole family would mislead you.
Main features of the ESP32
Processing performance
The original ESP32 has two 32-bit Xtensa LX6 cores, up to 240 MHz, and 520 KB of internal SRAM. Two cores let you split the work: one takes care of the network stack while the other runs your application. Newer models use a RISC-V core (C3, C6, H2) to lower cost and consumption, and the S3 adds vector instructions that speed up small neural networks.
Program memory is an external flash connected over SPI, mapped through a cache into the address space. That is why the program runs "from there" without being copied whole into RAM. Some modules add PSRAM, an external RAM that makes room for screens, cameras and large buffers.
Built-in wireless connectivity
- Wi-Fi: works as a station (joins a router), as an access point (creates its own network) or both at once. It supports WPA2 and WPA3.
- Bluetooth Low Energy (BLE): ideal for phones and low-power sensors. The original ESP32 also has Classic Bluetooth.
- ESP-NOW: an Espressif protocol that exchanges short messages between boards without a router, with low latency.
- 802.15.4: on the C6 and H2 models, the basis of Thread, Zigbee and the Matter standard.
Peripheral interfaces and GPIO
About 34 programmable pins on the original ESP32, and almost all of them accept several functions: digital input or output, PWM, UART, I2C, SPI, I2S, CAN (called TWAI), capacitive touch sensors and analog conversion. A routing system (the "GPIO matrix") lets you choose almost freely which function goes to which pin, which gives board-design freedom that few microcontrollers offer. The original also has an Ethernet MAC controller, so you can attach a PHY chip and use wired networking.
Power consumption and sleep modes
The chip switches modes as needed:
- Active: processor and radio on, in the range of a few tens to a little over a hundred milliamps, with higher peaks when transmitting.
- Modem-sleep: the radio switches off between packets, and the processor stays active.
- Light-sleep: the processor pauses and wakes on an event, keeping RAM.
- Deep-sleep: almost everything switches off, leaving only the ultra-low-power coprocessor (ULP) and the real-time clock memory. The chip draws on the order of microamps and wakes on a timer, a pin or the ULP.
Development boards draw much more than the chip, because the USB converter and the regulator are always on. For battery projects, measure your final board, not the bench one.
ESP32 architecture explained
Inside, the ESP32 is made of blocks tied together by internal buses. Understanding the blocks helps diagnose almost every problem.
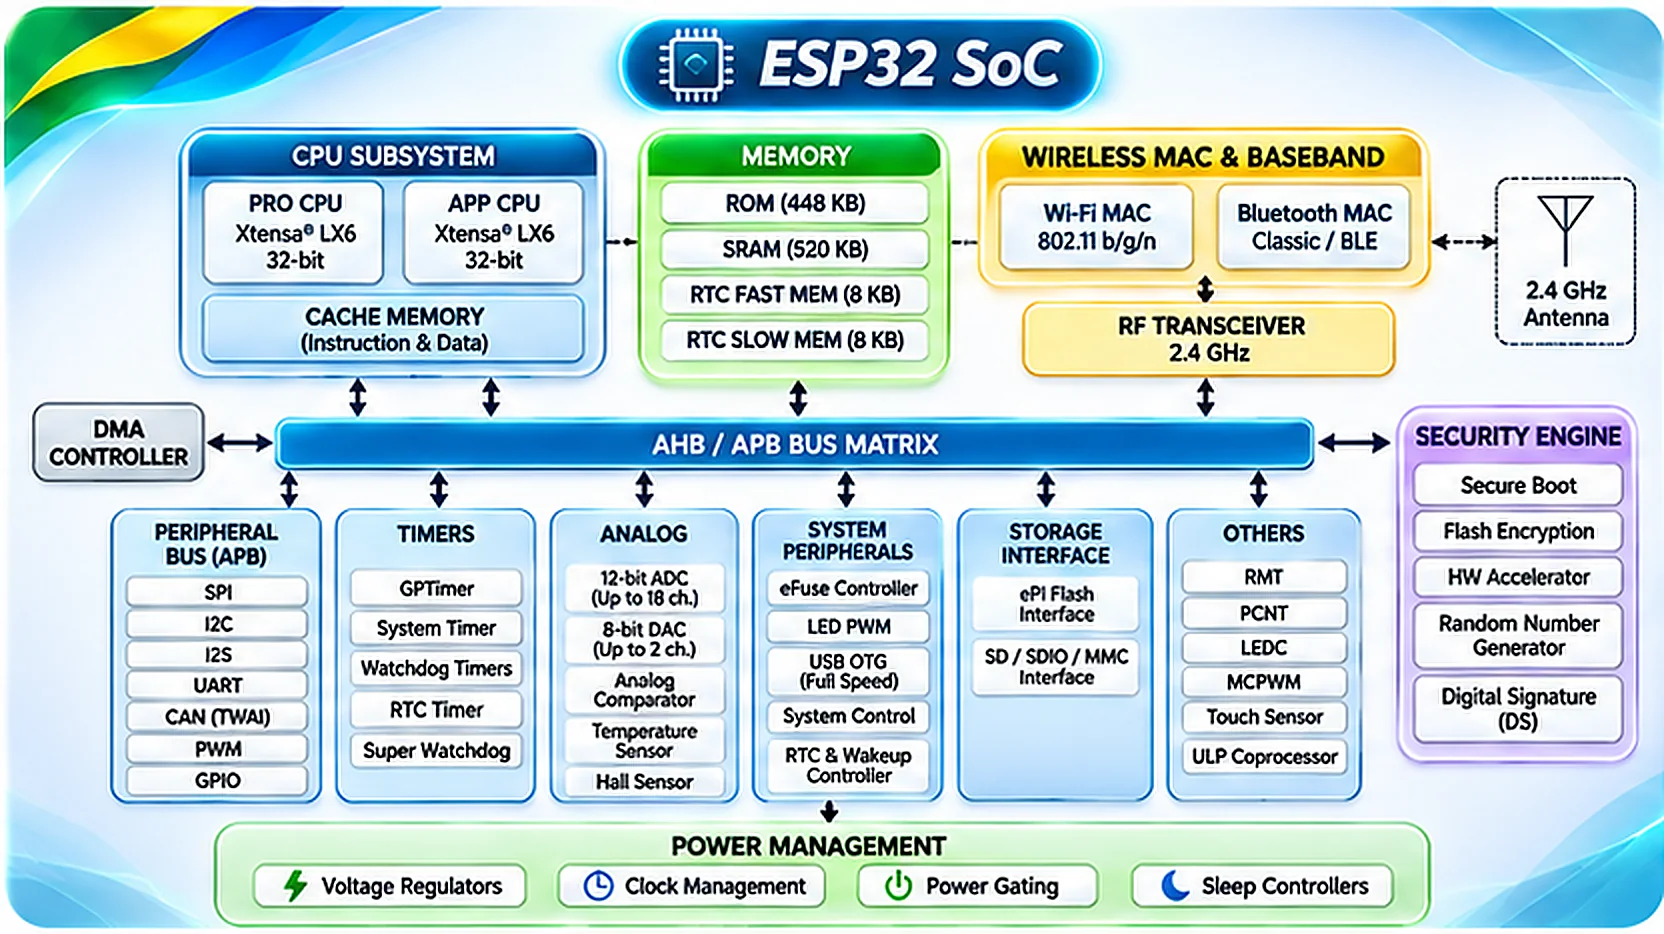
- CPU cores: one or two, with instruction and data caches. On the original, core 0 usually takes Wi-Fi and Bluetooth, and core 1 takes your application.
- Memories: the internal ROM holds the initial bootloader and basic routines; SRAM holds variables and the stack; the external flash holds the program and files; PSRAM, when present, is optional and slower.
- Radio and baseband: the 2.4 GHz transceiver, the digital part that assembles packets, and the Wi-Fi and Bluetooth controllers.
- Peripherals: GPIO, UART, SPI, I2C, I2S, PWM, ADC, DAC, CAN, Ethernet, touch sensor and timers. Many use DMA, which moves data without occupying the processor.
- Low-power domain: the real-time clock (RTC), a small memory that survives deep-sleep and the ULP coprocessor, which reads sensors with everything else off.
- Hardware security: AES, SHA and RSA accelerators, a random number generator, secure boot, flash encryption and eFuses, bits that can be written only once and hold keys and settings.
How does an ESP32 work?
Almost every project repeats the same five-step cycle.
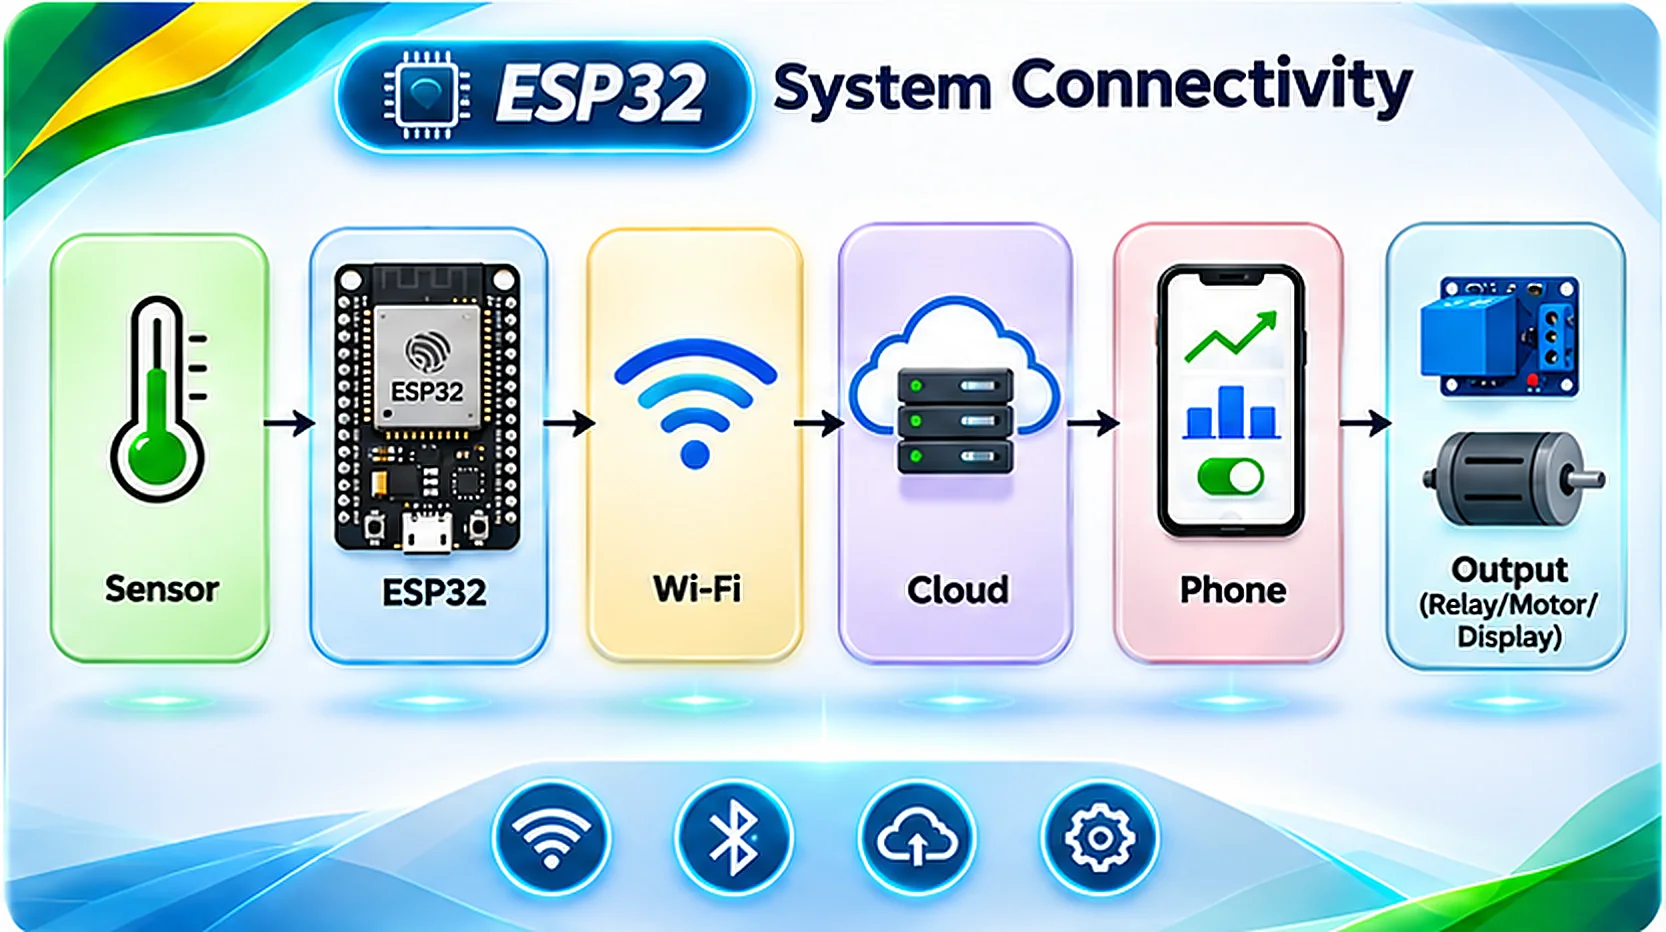
1. Interfacing with sensors
A sensor connects to a pin: digital (a button), analog (a potentiometer) or over a bus (I2C, SPI, UART, RS-485).
2. Data processing
The program filters, converts units and applies a rule. This is where you decide what is worth sending, and it is what separates a sensor that generates useless traffic from one that only speaks up when something changed.
3. Wireless communication
The radio joins the Wi-Fi network or pairs over BLE.
4. Sending data to the cloud
The data goes to a server, usually over MQTT or HTTP. The article on automatic MQTT reconnection shows how to survive a network that drops.
5. Output control
A response comes back and the ESP32 drives an output: a relay, a motor, a screen, an LED.
It does not freeze waiting for the network, because Wi-Fi runs in its own tasks of the built-in FreeRTOS real-time system. That is what lets you read a sensor every 100 ms and keep the server connection alive at the same time.
ESP32 series overview
Every letter in the name is a design choice. The most used models today:
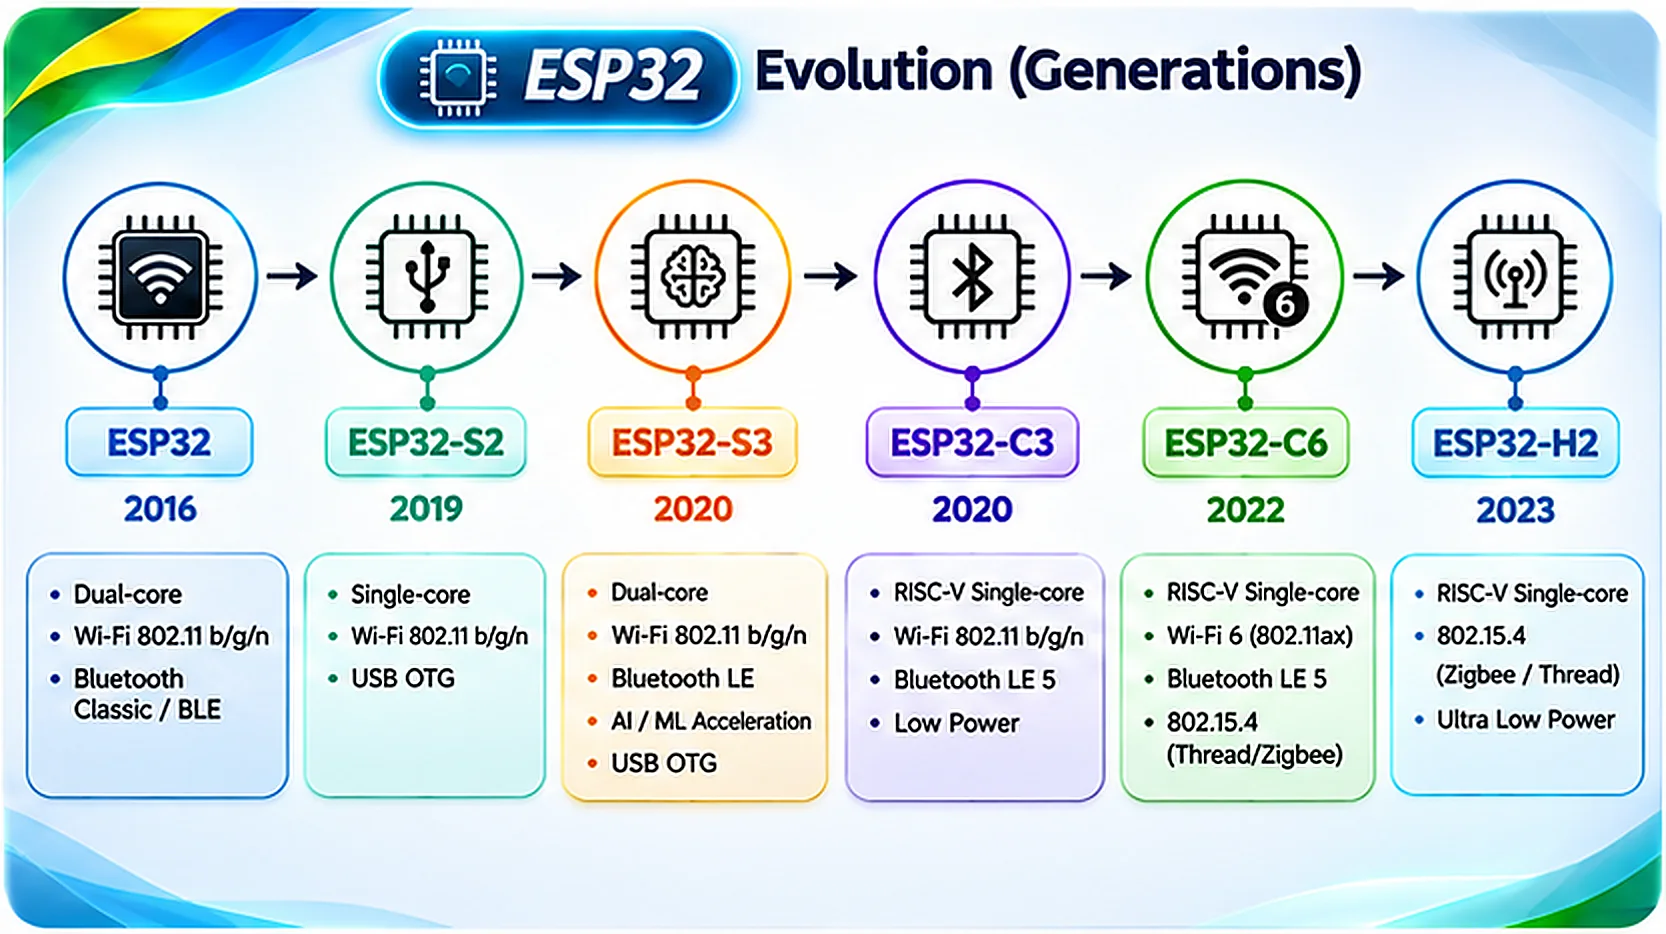
- ESP32 (original): two Xtensa LX6 cores, Wi-Fi, Classic Bluetooth and BLE 4.2. The best documented and the most common on cheap boards.
- ESP32-S2: one core, Wi-Fi only, native USB. Simpler, with no Bluetooth.
- ESP32-S3: two Xtensa LX7 cores, BLE 5, native USB, a camera interface and vector instructions for machine learning. It accepts external PSRAM (modules with 2 to 8 MB are common). This is the pick for new projects that need performance.
- ESP32-C3: a 160 MHz RISC-V core, Wi-Fi and BLE 5. It is one of the cheapest with a complete radio.
- ESP32-C6: RISC-V, Wi-Fi 6 and an 802.15.4 radio, the basis of Thread, Zigbee and Matter.
- ESP32-H2: BLE and 802.15.4 only, no Wi-Fi, for low-power networks.
- ESP32-P4: two RISC-V cores at 400 MHz, no radio of its own, with camera and video interfaces. It was designed for screens and local interfaces, not connectivity.
The portal's technical comparator puts the families side by side, and the choose your ESP32 page helps you decide.
Popular modules and development boards
For prototypes you buy a development board, which adds the USB-serial converter, the 3.3 V regulator and the reset and boot buttons to the module. For a product, the path is to design your own board around the module.
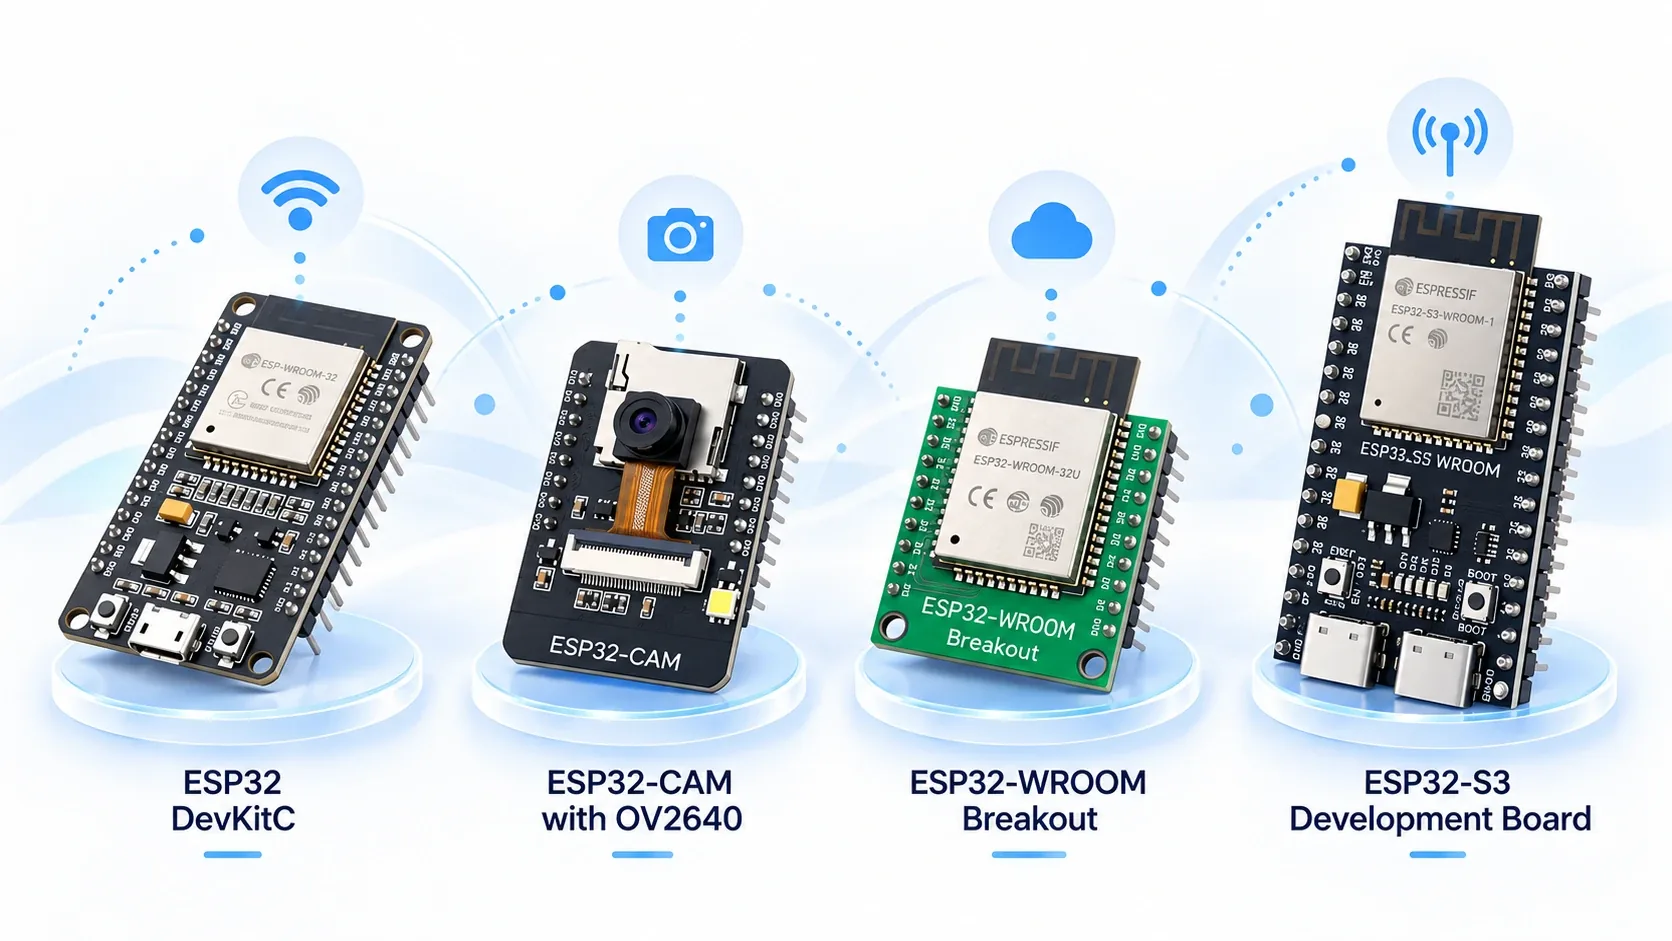
- ESP32-DevKitC: Espressif's reference board, ideal for learning.
- ESP32-CAM: includes an OV2640 camera and a microSD reader, for video and photos.
- WROOM module on a breakout: for those who want a certified module on a breadboard or in a product board.
- ESP32-S3 DevKit: the current option for camera, screen and artificial intelligence.
- M5Stack CoreS3 and ESP32-Ethernet-Kit: ready-made products with a screen or wired networking.
The board catalog has the datasheet of each one.
ESP32 software development ecosystem
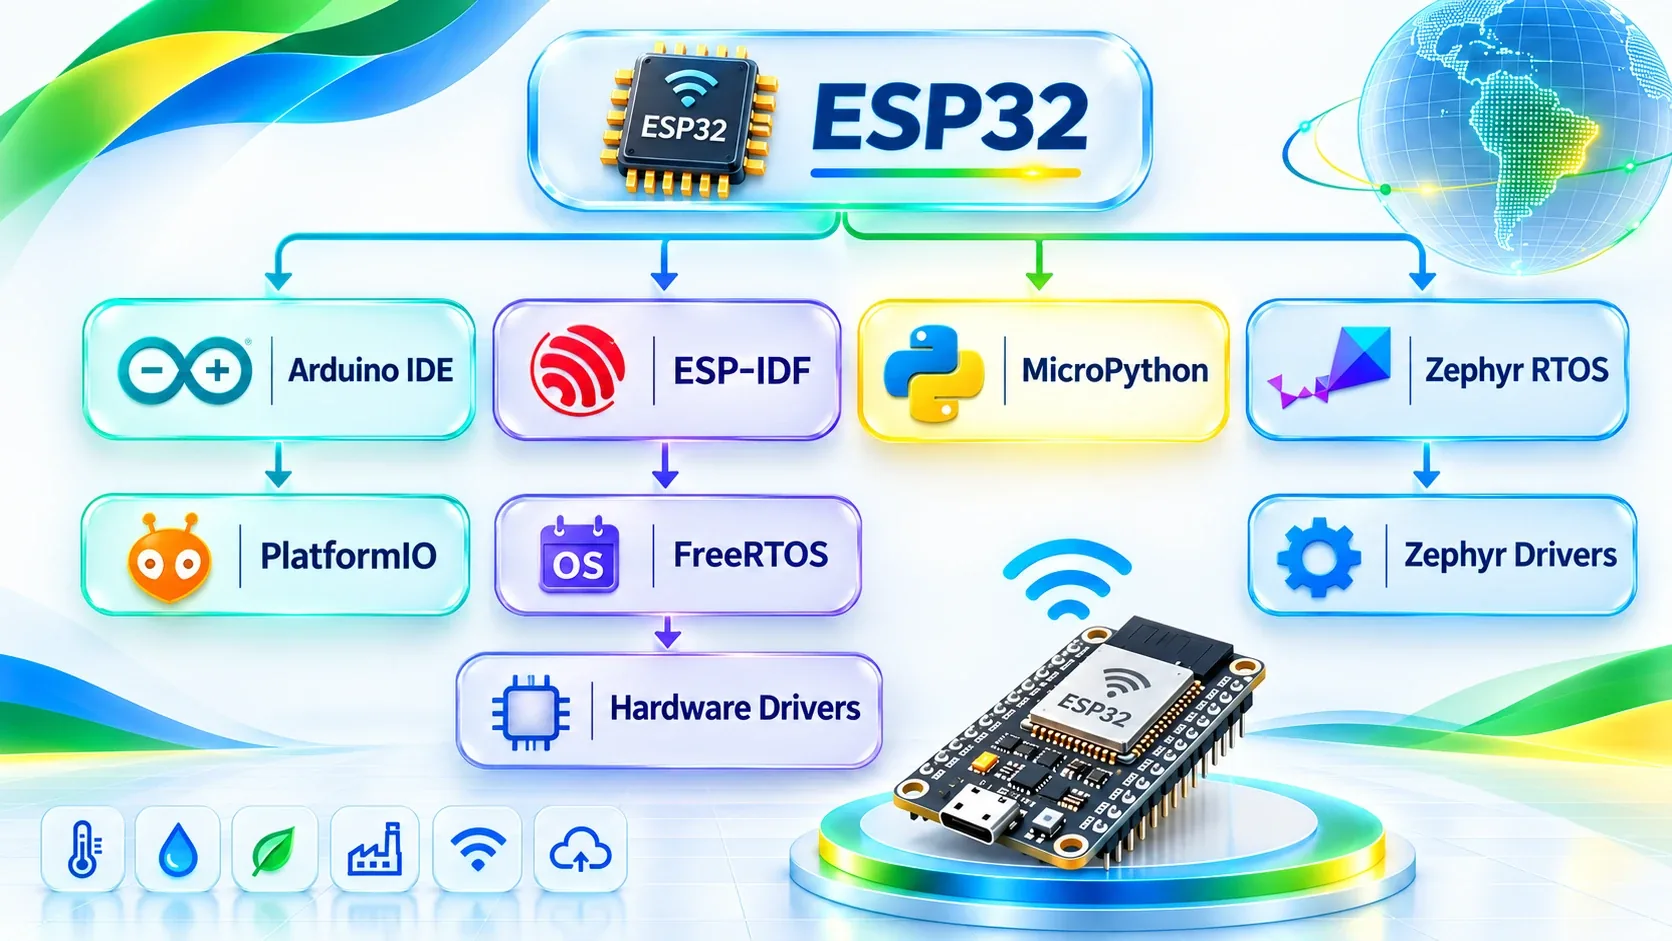
The same chip accepts several programming paths. Each one has its own page on the portal: ESP-IDF, Arduino, MicroPython, ESP-Matter and ESP-DSP.
ESP-IDF (official framework)
It is Espressif's framework, in C and C++, built on FreeRTOS. It gives access to everything: all peripherals, networking, security, OTA updates and flash partitioning. It is what supports commercial products.
Arduino
The Arduino core for ESP32 hides the complexity behind simple functions such as `digitalWrite` and `WiFi.begin`. Great for learning and prototyping, and it runs on top of ESP-IDF underneath. A minimal example that connects to Wi-Fi and prints the address and the signal strength:
| 1 | #include <WiFi.h> |
| 2 | |
| 3 | const char* ssid = "YOUR_NETWORK"; |
| 4 | const char* password = "YOUR_PASSWORD"; |
| 5 | |
| 6 | void setup() { |
| 7 | Serial.begin(115200); |
| 8 | WiFi.begin(ssid, password); |
| 9 | while (WiFi.status() != WL_CONNECTED) { |
| 10 | delay(500); |
| 11 | Serial.print("."); |
| 12 | } |
| 13 | Serial.printf("\nIP: %s signal: %d dBm\n", |
| 14 | WiFi.localIP().toString().c_str(), WiFi.RSSI()); |
| 15 | } |
| 16 | |
| 17 | void loop() {} |
PlatformIO
It is not a language, it is a development environment: it manages boards, libraries and builds, and lets you use Arduino or ESP-IDF in the same project. The article what is PlatformIO explains it, and first steps in VS Code takes you to your first program.
MicroPython and Zephyr
MicroPython swaps C for Python: fast for testing an idea, slower and heavier on memory than compiled code. Zephyr is an open-source real-time operating system with ESP32 support, useful when the project needs the same code on chips from different makers.
Real-time operating systems
FreeRTOS comes inside ESP-IDF and the Arduino core. It splits the program into tasks with priorities, queues and timers, and it is what lets a chip with few cores do several things at once. If you only use `setup` and `loop`, you are already using tasks without noticing.
Community and documentation
Espressif maintains detailed documentation, datasheets and examples, and the community is one of the largest among microcontrollers. For terms, use the portal's glossary; for your specific error, CopiBR answers.
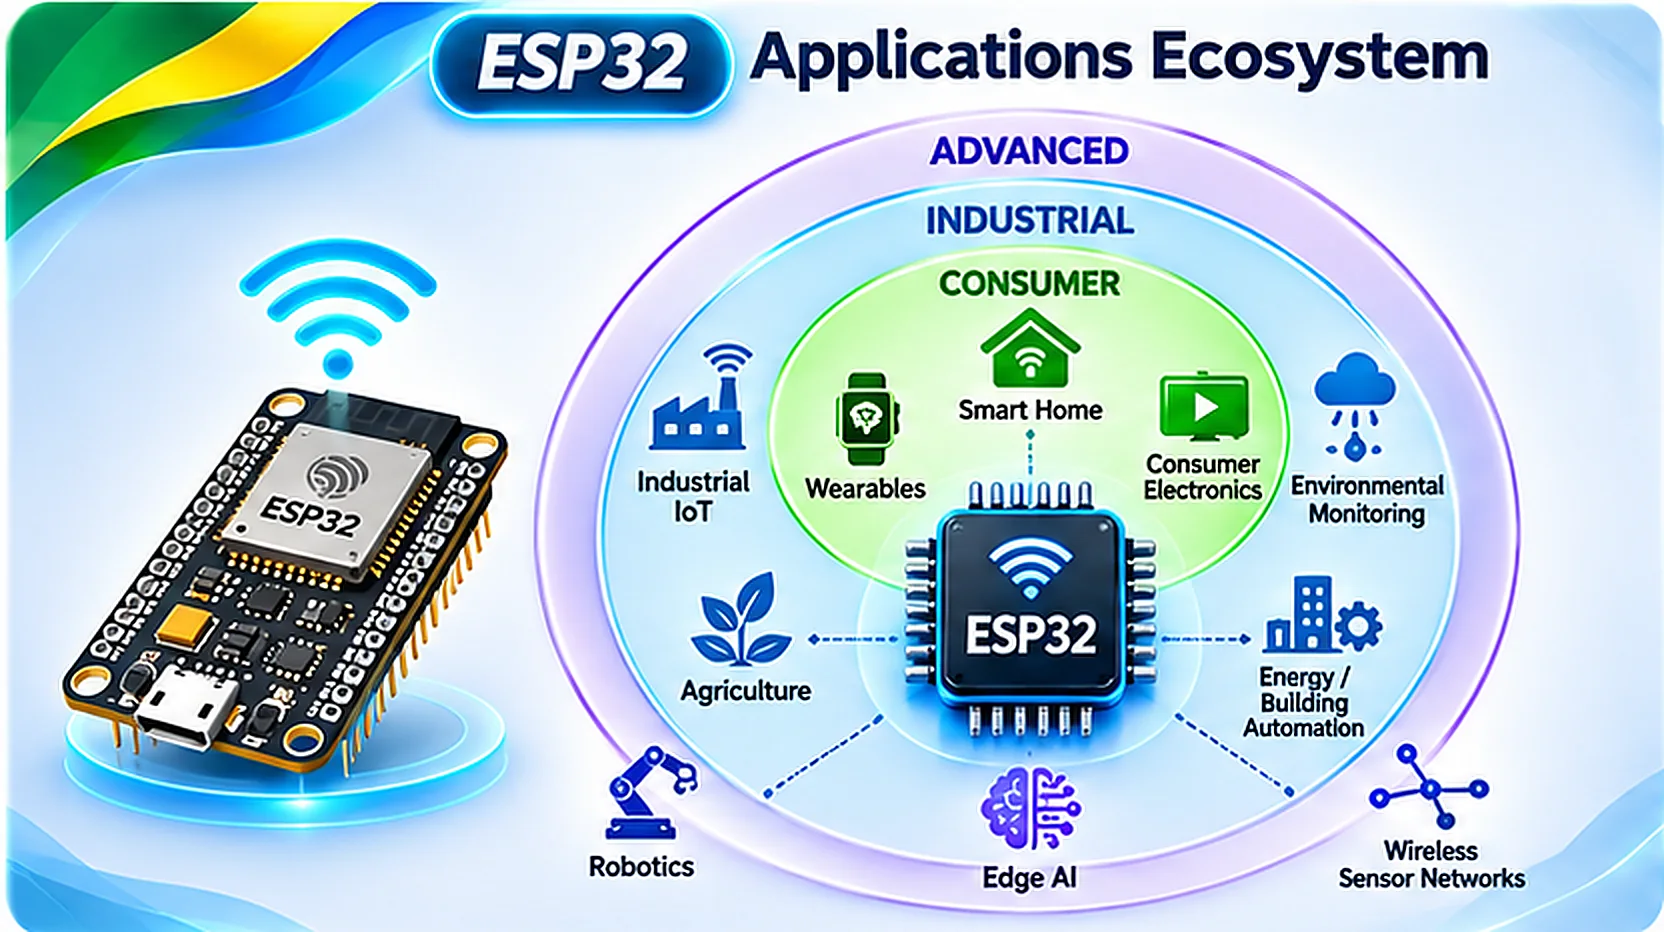
Common ESP32 applications
Consumer applications
Smart bulbs and plugs, thermostats, door sensors, panels with screens, wearables, connected toys. Support for the Matter standard on the C6 and H2 models brings the ESP32 closer to shelf products.
Industrial applications
Temperature and vibration monitoring of motors, part counting, reading meters over Modbus RTU on RS-485, gateways that carry plant-floor data up to the SCADA. The portal has a hands-on article for each: Modbus RTU reading, production counter and sending data to SCADA and MES.
Advanced applications
Light computer vision, keyword voice recognition, robotics, precision agriculture, wireless sensor networks and even very small language models, as the article on llama2.c on the ESP32-S3 shows.
Which ESP32 is right for your project?
Ask what the project requires, not for the most famous name.
- Learning and prototyping: original ESP32 or S3, for the number of examples.
- Simple, cheap sensor with Wi-Fi: ESP32-C3.
- Camera, screen, audio or AI: ESP32-S3, with PSRAM.
- Smart home with Matter, Thread or Zigbee: ESP32-C6 (with Wi-Fi) or H2 (without Wi-Fi).
- High-performance local graphical interface: ESP32-P4, usually paired with a radio chip.
- Battery for years: the model matters less than the design, with deep-sleep and few transmissions a day.
- Wired network: original ESP32 with a PHY, or a board with Ethernet such as the ESP32-Ethernet-Kit.
Still unsure? Answer a few questions in the Choose your ESP32 selector and get a recommendation, compare the families side by side in the technical comparator and see each board's datasheet in the board catalog.
Choose my ESP32: answer the selector
ESP32 vs other popular microcontrollers
- ESP8266: the predecessor. One core, Wi-Fi only and fewer pins. It still suits simple projects, but the ESP32-C3 costs about the same and does more.
- Arduino Uno (ATmega328P): 8-bit, 16 MHz, 2 KB of RAM, 5 V pins and no networking. Simpler and more robust for basic input and output, but it cannot connect.
- STM32: ARM Cortex-M microcontrollers with very complete peripherals and great real-time behavior, used in a lot of industrial product. Usually no built-in radio, and the platform has a steeper learning curve.
- Raspberry Pi Pico W (RP2040): two Cortex-M0+ cores, good for Python and with PIO blocks. Wi-Fi comes from a separate chip, and the networking ecosystem is smaller.
- nRF52: focused on Bluetooth Low Energy and minimal consumption, with no Wi-Fi. It beats the ESP32 when the project is BLE-only on a battery.
- Raspberry Pi (computer): runs Linux, for databases, video and many services. The ESP32 starts in milliseconds and draws little, but does one thing at a time.
ESP32 advantages and disadvantages
ESP32 advantages
- Very low cost for what it delivers.
- Built-in Wi-Fi and Bluetooth, with no extra module.
- A huge ecosystem of libraries, examples and answers.
- Over-the-air firmware updates (OTA).
- Adjustable consumption, from active to deep-sleep.
- Hardware security: secure boot and flash encryption.
ESP32 disadvantages
- 3.3 V logic. The pins do not tolerate 5 V. Wiring a 24 V or 5 V output straight in damages the chip, and in industry that calls for an optocoupler or an interface module.
- Poorly linear ADC. The analog reading of the original ESP32 has drift, and ADC2 is unavailable while Wi-Fi is on.
- Radio noise. Wi-Fi and Bluetooth produce current peaks of hundreds of milliamps. A weak supply causes seemingly inexplicable restarts.
- Not a PLC. It has no functional-safety certification, and the firmware depends on whoever wrote it. Use the ESP32 as a gateway and sensor, and leave safety interlocking to equipment built for it.
- 2.4 GHz radio only on most models, a band that is crowded in places full of networks.
ESP32 hardware design guidelines
- Power supply: design for the Wi-Fi current peak, with a capacitor close to the module. A weak supply is the number one cause of mysterious restarts.
- Antenna: keep the antenna area clear of metal, copper and ground plane, and use a module whose antenna suits the enclosure.
- Boot (strapping) pins: GPIO0, GPIO2, GPIO5, GPIO12 and GPIO15 define how the chip starts. A sensor or a pull-down wired there can stop the board from booting.
- Flash pins: GPIO6 to 11 are tied to the external flash on most modules. Do not use them.
- Input-only pins: GPIO34 to 39 have no internal pull-up resistor.
- Input and output protection: isolate industrial signals with an optocoupler, and protect against surge and electrostatic discharge.
- Safe restart: use the watchdog. The article watchdog and failure recovery shows how the device recovers by itself.
- Field updates: plan OTA from the start, with a rollback partition, as in the article on OTA updates on the ESP32.
- Security: in a product, turn on secure boot and flash encryption before the first unit ships.
Frequently asked questions about the ESP32
Q: What is the ESP32's role in IoT architectures?
It is usually the edge node: it reads sensors, filters the data and sends it over MQTT or HTTP to a server, from where it goes on to dashboards and databases. In larger architectures it also acts as a gateway, translating a field protocol (such as Modbus) to the IP network.
Q: How do the wireless capabilities affect network security?
Connecting a device to Wi-Fi exposes it to the network. Use WPA2 or WPA3, TLS on connections to the server, unique credentials per device, signed firmware and a separate network (VLAN) for IoT devices. Secure boot and flash encryption protect the firmware against copying and replacement.
Q: When is the ESP32 better than a traditional microprocessor?
When the project needs to start fast, draw little, respond in real time and cost little, without a full operating system. If the project demands a database, a rich graphical interface or heavy video, a single-board computer is the better choice.
Q: Why use ESP-IDF instead of Arduino in commercial products?
Because ESP-IDF gives fine control of memory, tasks, partitions, OTA, security and consumption, and follows Espressif's fixes with no intermediate layer. Arduino is great for validating the idea, and many teams move to ESP-IDF when the product goes into production.
Q: What are the power challenges in battery-powered devices?
The radio's current peaks, which bring weak batteries down, and the hidden consumption on the board (regulator, USB converter, LEDs). The answer is deep-sleep, few transmissions a day, a regulator with low quiescent current and measuring the final board.
Q: How do you work around the ADC's non-linearity?
Calibrate with the factory values stored in the chip, average several readings, avoid the ends of the range and, for precision measurement, use an external converter (such as an ADS1115) over I2C.
Q: What are boot (strapping) pins and why are they risky?
They are pins read at the instant the chip powers up to decide the boot mode and details such as the flash voltage. If the board's circuit forces them to the wrong level, the ESP32 does not start or flashes wrong. Check your module's datasheet before wiring anything to those pins.
Conclusion
The ESP32 brings processing, radio and peripherals into one cheap, well-documented component, and that is why it became the base of an enormous variety of connected products, from the smart bulb to the industrial gateway. Choosing the right model, taking care of the power supply, protecting the pins and planning OTA and security from the start is what separates a bench prototype from equipment that runs for years without a visit.
The shortest path to start: pick a board in the catalog, install PlatformIO following the VS Code article, flash the Wi-Fi example above and read a sensor. Then move on to MQTT, continuous monitoring and OTA.